Install YugabyteDB Anywhere
Use the following instructions to install YugabyteDB Anywhere software. For guidance on which method to choose, see YBA prerequisites.
Note: For higher availability, one or more additional YugabyteDB Anywhere instances can be separately installed, and then configured later to serve as passive warm standby servers. See Enable High Availability for more information.
To install YugabyteDB Anywhere on an OpenShift cluster, you can use the Helm tool. Red Hat certified Helm charts are also available.
Note
As YugabyteDB Anywhere was formerly called Yugabyte Platform, you might see the latter still used in the OpenShift environment.Prerequisites
Before you install YugabyteDB Anywhere on an OpenShift cluster, you need to prepare the environment, as described in Prepare the OpenShift environment.
Configure the OpenShift command-line interface (CLI) oc by logging in to the OpenShift Container Platform (OCP) web console with your user account. For more information and specific instructions, see Getting Started with the CLI in the Red Hat documentation.
Unless otherwise specified, you can use a user account for executing the steps described in this document. Using an admin account for all the steps should work as well.
Additionally, you need to perform the following steps before attempting to install YugabyteDB Anywhere using Helm:
-
Verify that the OpenShift cluster is configured with Helm 3.8 or later by executing the following command:
helm versionThe output should be similar to the following:
version.BuildInfo{Version:"v3.8.0", GitCommit:"d14138609b01886f544b2025f5000351c9eb092e", GitTreeState:"clean", GoVersion:"go1.17.5"} -
Create a new project (namespace) called yb-platform by executing the following command:
oc new-project yb-platformExpect the following output:
Now using project "yb-platform" on server "web-console-address" -
Apply the YugabyteDB Anywhere secret that you obtained from Yugabyte Support by executing the following command:
oc create -f yugabyte-k8s-secret.yml -n yb-platformExpect the following output:
secret/yugabyte-k8s-pull-secret created
Certified Helm chart-based installation
Note
The YugabyteDB Anywhere Red Hat certified Helm chart is only available for stable releases of YugabyteDB Anywhere.Installing the YugabyteDB Anywhere Red Hat certified Helm chart on an OpenShift cluster involves the following:
- Installing YugabyteDB Anywhere using certified Helm chart
- Finding the availability zone labels
- Accessing and configuring YugabyteDB Anywhere
Install YugabyteDB Anywhere using certified Helm chart
You can install the YugabyteDB Anywhere Red Hat certified Helm chart using OpenShift console as follows:
-
Log in to the OCP cluster's web console using admin credentials (for example, kube:admin).
-
If the console shows Administrator in the top left corner, then switch it to the Developer mode.
-
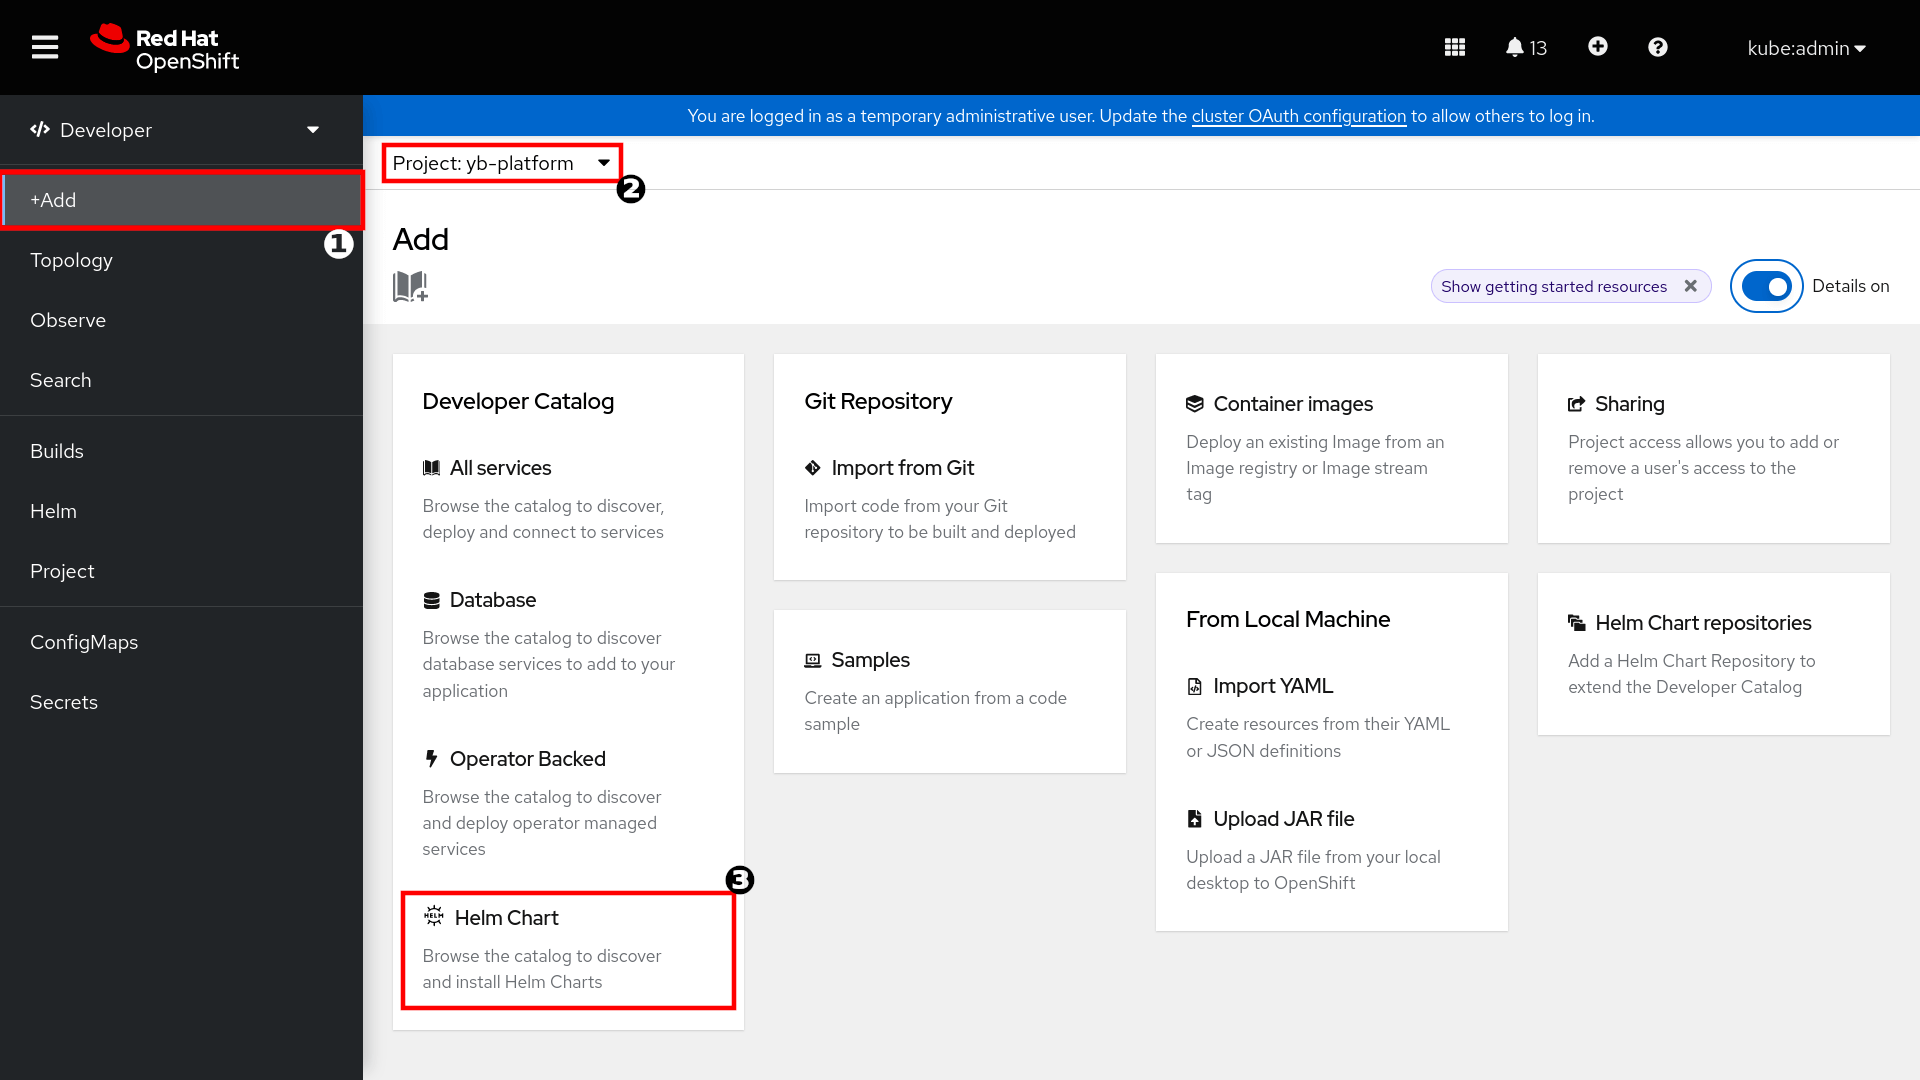
Navigate to the +Add section, and select the "yb-platform" project which you created in the Prerequisites.
-
Select Helm Chart from the Developer Catalog section as shown in the following illustration:
-
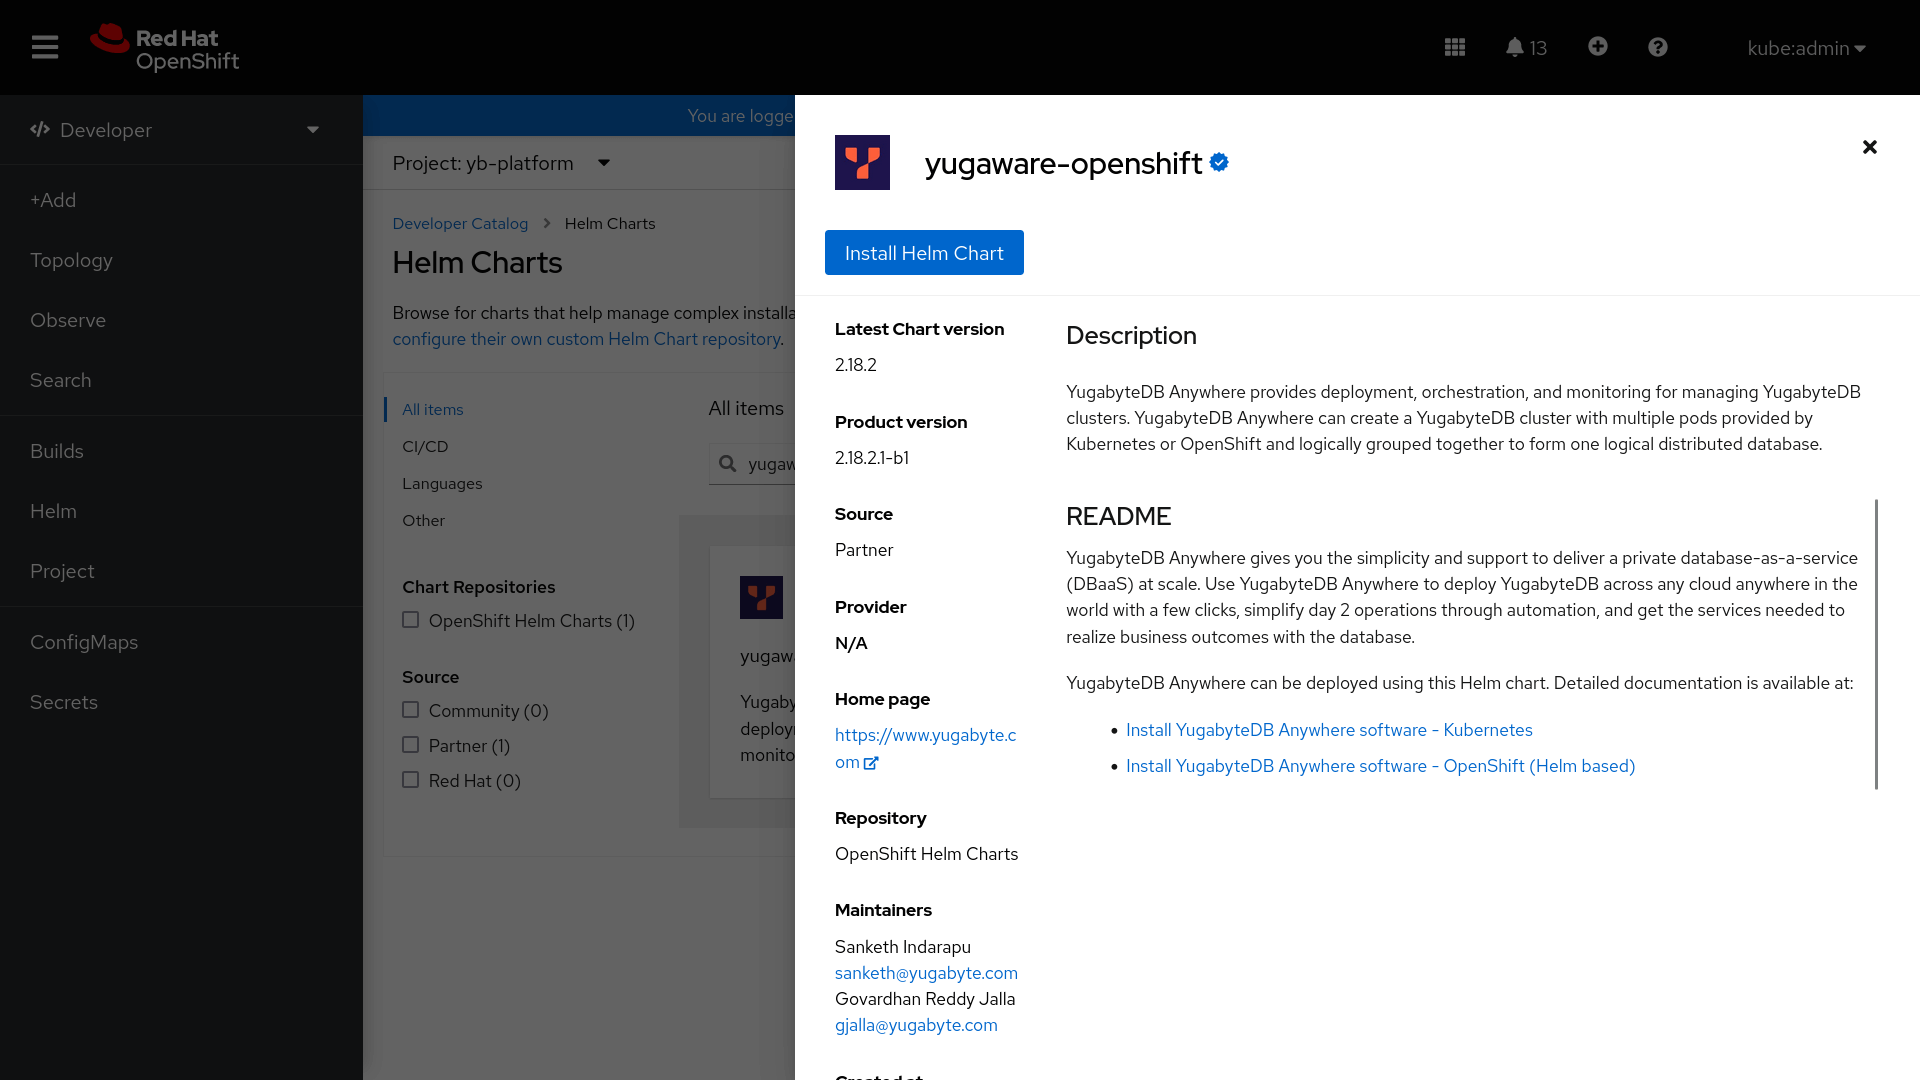
Search for "yugaware-openshift", and open it to display details about the chart, as shown in the following illustration:
-
Click Install Helm Chart.
-
On a terminal, verify the StorageClass setting for your cluster by executing the following command as admin user:
oc get storageClassIf your cluster doesn't have a default StorageClass (an entry with
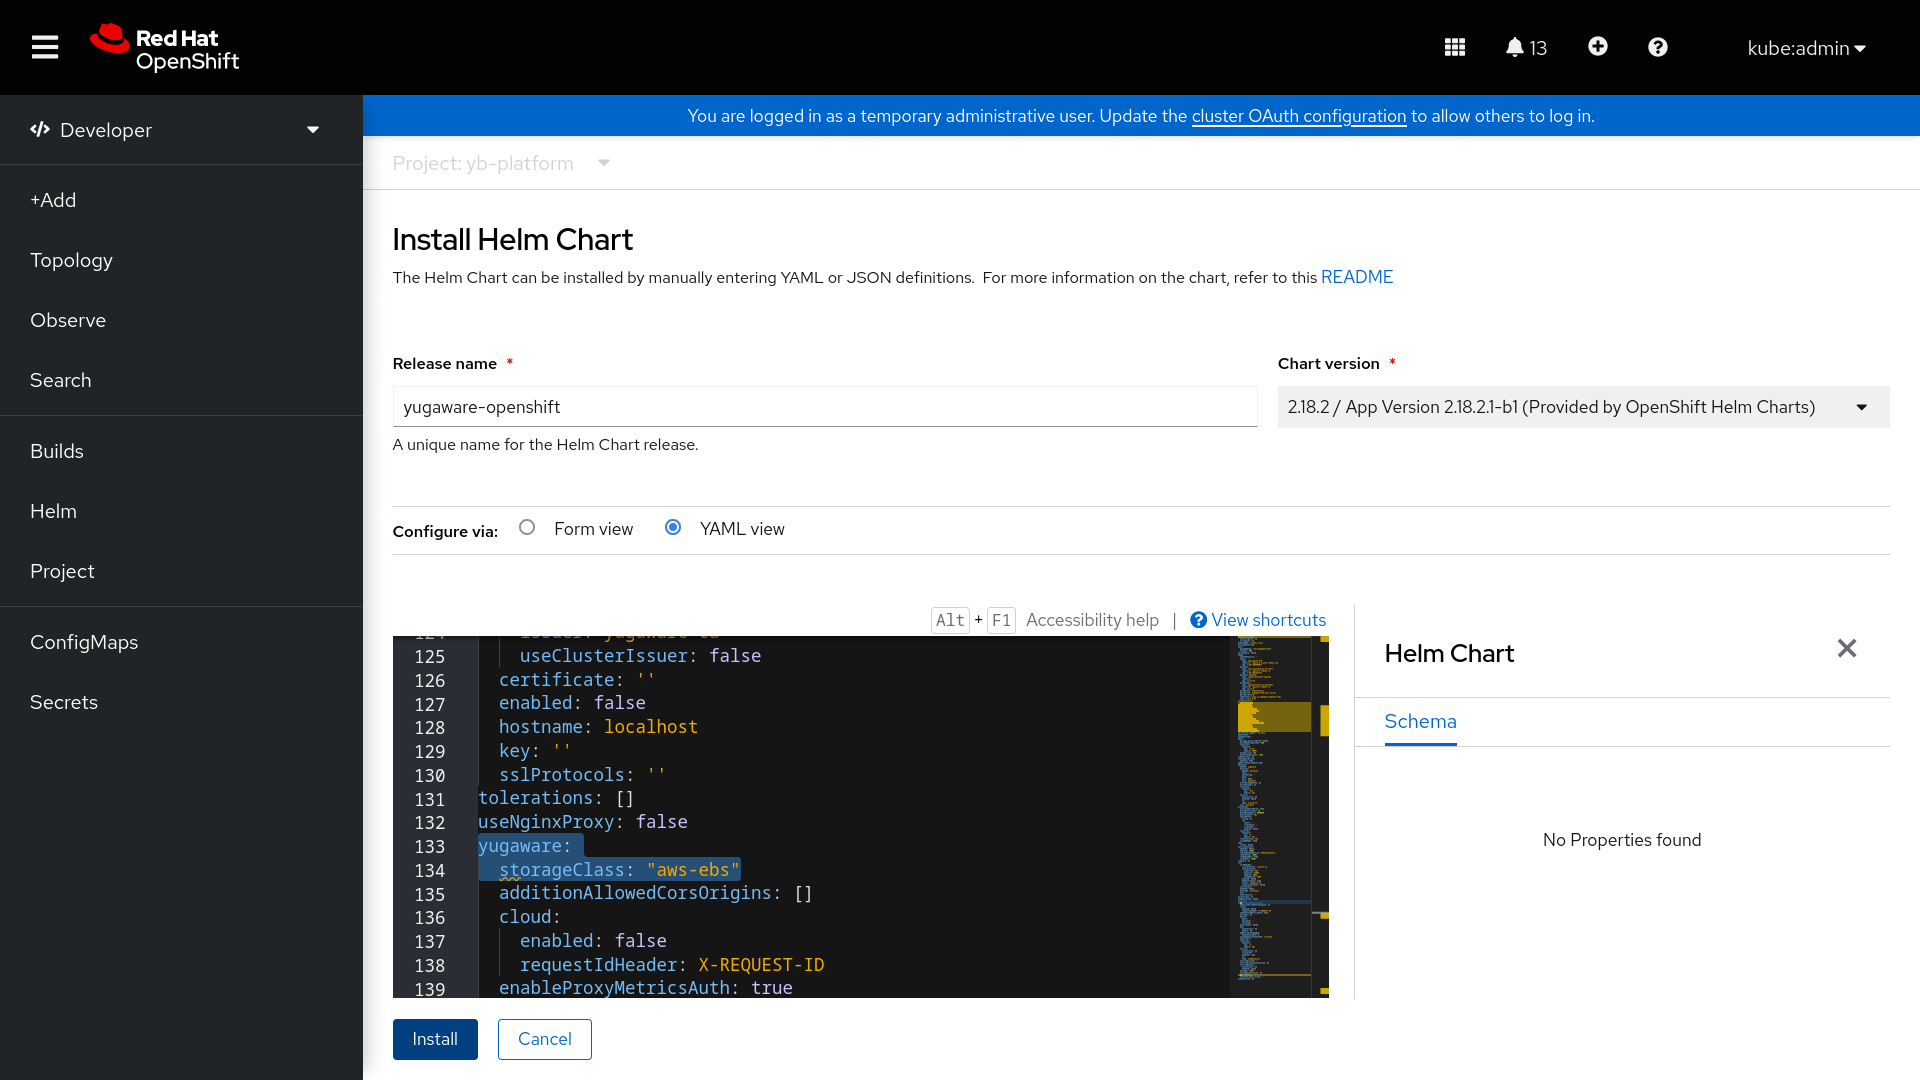
(default)in its name) or you want to use a different StorageClass than the default one, set the value ofyugaware.storageClassto<storage-class-name>when installing the YugabyteDB Anywhere Helm chart in the next step. -
To customize the installation, modify the values in the YAML view in the console, and click Install. The following image shows a custom StorageClass configuration:
See Customize YugabyteDB Anywhere for details about the supported Helm values.
Note that if you are performing the preceding steps as an admin user, then you can set
rbac.createtotrue. Alternatively, you can ask the cluster administrator to perform the next step. -
Optionally, execute the following command as an admin user to create ClusterRoleBinding:
oc apply -f - <<EOF
kind: ClusterRoleBinding
apiVersion: rbac.authorization.k8s.io/v1
metadata:
  name: yugaware-openshift-cluster-monitoring-view
  labels:
    app: yugaware
subjects:
- kind: ServiceAccount
  name: yugaware-openshift
  namespace: yb-platform
roleRef:
  kind: ClusterRole
  name: cluster-monitoring-view
  apiGroup: rbac.authorization.k8s.io
EOF
If you don't create the ClusterRoleBinding, some container-level metrics like CPU and memory will be unavailable.
After installation is complete, the status is shown as follows:

You can also install the certified Helm chart using the CLI. For instructions, refer to Installing a Helm chart on an OpenShift Container Platform cluster in the Red Hat documentation.
Helm-based installation
Installing YugabyteDB Anywhere on an OpenShift cluster using Helm involves the following:
- Creating an instance of YugabyteDB Anywhere
- Finding the availability zone labels
- Accessing and configuring YugabyteDB Anywhere
Create an instance of YugabyteDB Anywhere via Helm
To create a YugabyteDB Anywhere instance, perform the following:
-
Execute the following command to add the YugabyteDB charts repository:
helm repo add yugabytedb https://charts.yugabyte.comExpect the following output:
"yugabytedb" has been added to your repositoriesTo search for the available chart version, execute the following command:
helm search repo yugabytedb/yugaware --version 2.19.3Expect the following output:
NAME CHART VERSION APP VERSION DESCRIPTION yugabytedb/yugaware 2.19.3 2.19.3.0-b140 YugaWare is YugaByte Database's Orchestration a... -
Verify the StorageClass setting for your cluster by executing the following command as admin user:
oc get storageClassIf your cluster doesn't have a default StorageClass (an entry with
(default)in its name) or you want to use a different StorageClass than the default one, add--set yugaware.storageClass=<storage-class-name>when installing the YugabyteDB Anywhere Helm chart in the next step. -
Execute the following command to install the YugabyteDB Anywhere Helm chart:
helm install yw-test yugabytedb/yugaware -n yb-platform \
   --version 2.19.3 \
   --set image.repository=quay.io/yugabyte/yugaware-ubi \
   --set ocpCompatibility.enabled=true --set rbac.create=false \
   --set securityContext.enabled=false --wait
Expect to see a message notifying you whether or not the deployment is successful.
Note that if you are executing the preceding command as an admin user, then you can set
rbac.create=true. Alternatively, you can ask the cluster administrator to perform the next step. -
Optionally, execute the following command as an admin user to create ClusterRoleBinding:
oc apply -f - <<EOF
kind: ClusterRoleBinding
apiVersion: rbac.authorization.k8s.io/v1
metadata:
  name: yw-test-cluster-monitoring-view
  labels:
    app: yugaware
subjects:
- kind: ServiceAccount
  name: yw-test
  namespace: yb-platform
roleRef:
  kind: ClusterRole
  name: cluster-monitoring-view
  apiGroup: rbac.authorization.k8s.io
EOF
If you don't create the ClusterRoleBinding, some container-level metrics like CPU and memory will be unavailable.
You can customize the installation by specifying more values, see Customize YugabyteDB Anywhere for details about the supported Helm values.
Delete the Helm installation of YugabyteDB Anywhere
You can delete the Helm installation by executing the following command:
helm delete yw-test -n yb-platform
Find the availability zone labels
You need to find the region name and availability zone codes where the cluster is running. This information is required by YugabyteDB Anywhere (see Create a Provider in YugabyteDB Anywhere). For example, if your OCP cluster is in the US East, then the cloud provider's zone labels can be us-east4-a, us-east4-b, and so on.
You can use the OpenShift web console or the command line to search for the availability zone codes.
Use the OpenShift web console
You start by logging in to the OCP web console as an admin user, and then performing the following:
-
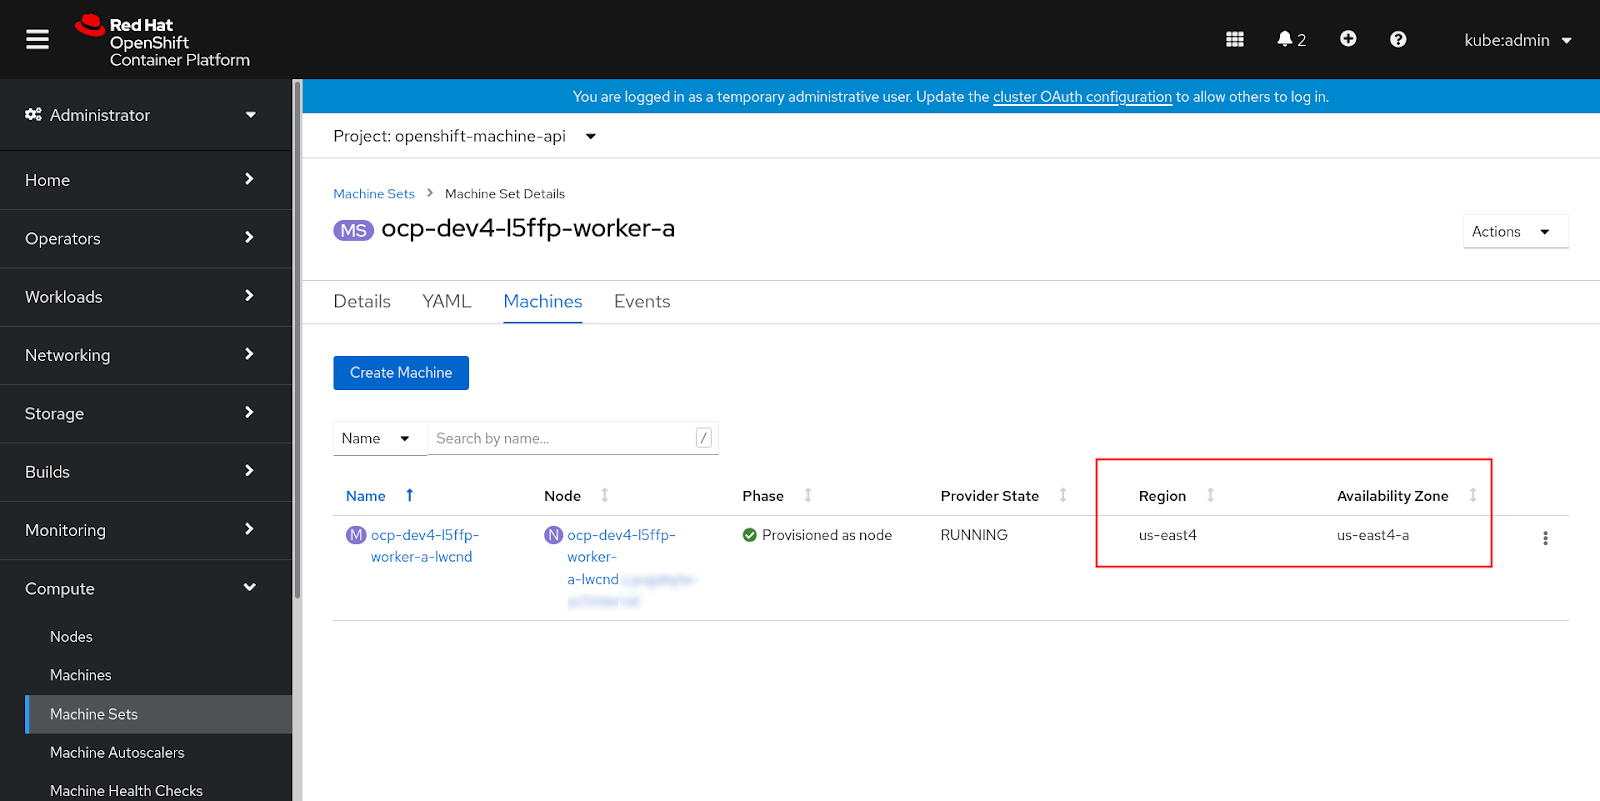
Navigate to Compute > Machine Sets and open each Machine Set.
-
On the Machine Set Details page, open the Machines tab to access the region and availability zone label, as shown in the following illustration where the region is US East and the availability zone label is us-east4-a:
Use the command line
Alternatively, you can find the availability zone codes using the oc CLI.
You start by configuring oc with an admin account (kube:admin) and following the procedure described in Getting Started with the CLI from the Red Hat documentation.
To find the region and zone labels, execute the following command:
oc get machinesets \
  -n openshift-machine-api \
  -ojsonpath='{range .items[*]}{.metadata.name}{", region: "}{.spec.template.spec.providerSpec.value.region}{", zone: "}{.spec.template.spec.providerSpec.value.zone}{"\n"}{end}'
Expect the following output:
ocp-dev4-l5ffp-worker-a, region: us-east4, zone: us-east4-a
ocp-dev4-l5ffp-worker-b, region: us-east4, zone: us-east4-b
ocp-dev4-l5ffp-worker-c, region: us-east4, zone: us-east4-c
After the execution, the region is displayed as US East and the zones as us-east4-a, us-east4-b, and so on.
Access and configure YugabyteDB Anywhere
After you have created and deployed YugabyteDB Anywhere, you can access its web UI and create an account.
Find the location to access the web UI
To find the location (IP address or hostname), you can use the OpenShift web console or the command line.
Use the OpenShift web console
You can obtain the location using the OpenShift web console as follows:
-
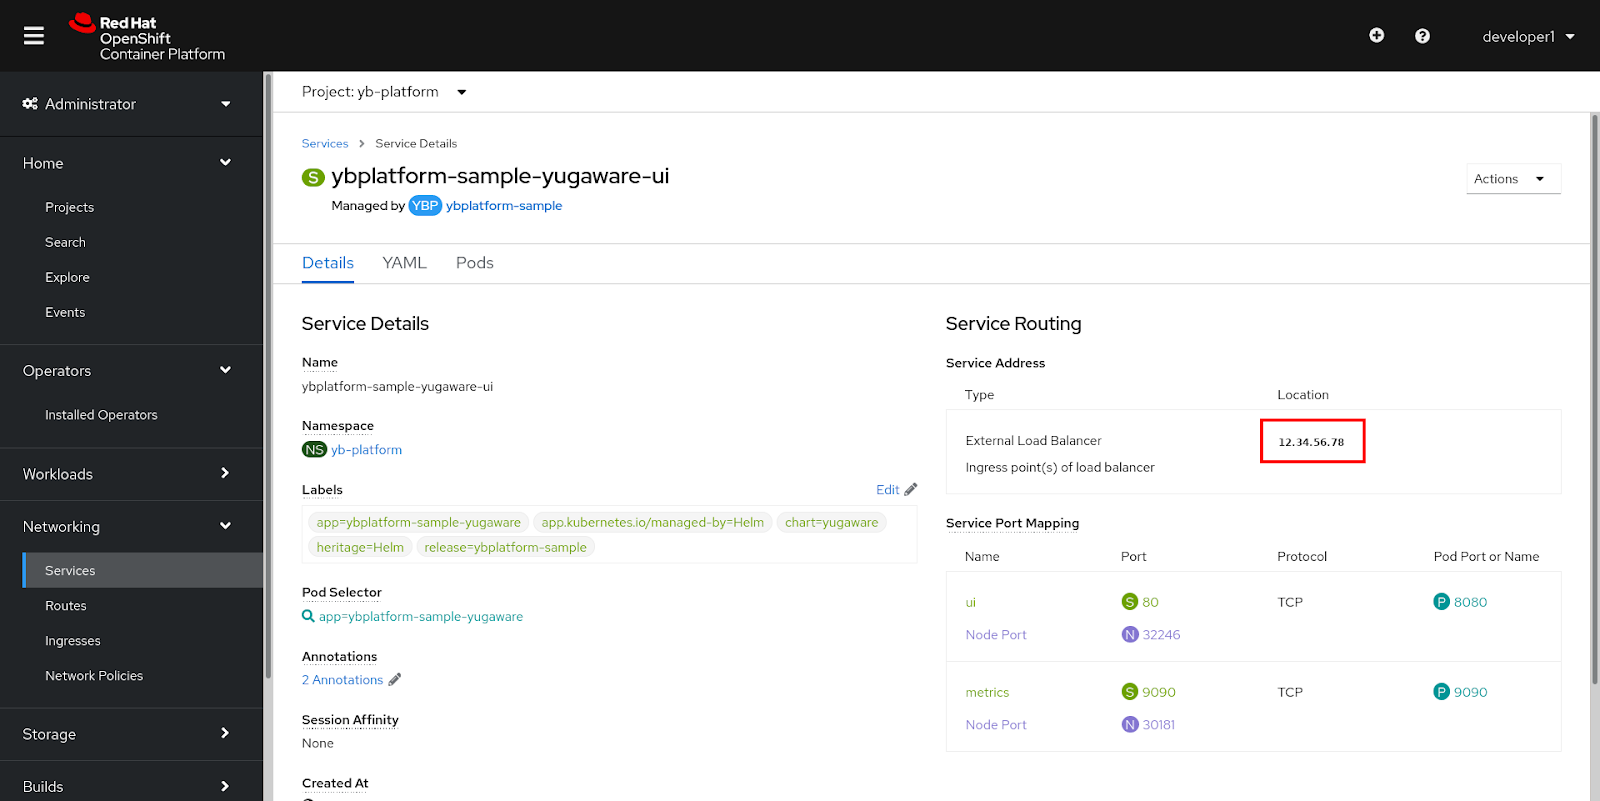
Use the OCP web console to navigate to Networking > Services and select ybplatform-sample-yugaware-ui from the list. Ensure that the yb-platform project is selected.
-
In the Service Routing section of the Details tab, locate External Load Balancer and copy the value, as shown in the following illustration:
-
Open the copied location in a new instance of your web browser.
Use the command line
Alternatively, you can find the location using the oc CLI.
In case of the Operator-based installation of YugabyteDB Anywhere, execute the following command:
oc get services \
  ybplatform-sample-yugaware-ui \
  -ojsonpath='{.status.loadBalancer.ingress[0].ip}{"\n"}
              {.status.loadBalancer.ingress[0].hostname}{"\n"}'
Expect the following output:
12.34.56.78
In case of the Helm-based installation, execute the following command:
oc get services \
   yw-test-yugaware-ui \
  -ojsonpath='{.status.loadBalancer.ingress[0].ip}{"\n"}
              {.status.loadBalancer.ingress[0].hostname}{"\n"}'
Expect the following output:
12.34.56.78