Unplanned failover
Unplanned failover is the process of switching application traffic to the Standby universe in case the Primary universe becomes unavailable. One of the common reasons for such a scenario is an outage of the Primary universe region.
Performing failover
Assuming universe A is the Primary and universe B is the Standby, use the following procedure to perform an unplanned failover and resume applications on B.
Pause replication and get the safe time
If the Primary (A) is terminated for some reason, do the following:
-
Stop the application traffic to ensure no more updates are attempted.
-
Pause replication on the Standby (B). This step is required to avoid unexpected updates arriving through replication, which can happen if the Primary (A) comes back up before failover completes.
./bin/yb-admin \
    -master_addresses <standby_master_addresses> \
    -certs_dir_name <cert_dir> \
    set_universe_replication_enabled <replication_name> 0
Expect output similar to the following:
Replication disabled successfully -
Get the latest consistent time on Standby (B). The
get_xcluster_safe_timecommand provides an approximate value for the data loss expected to occur when the unplanned failover process finishes, and the consistent timestamp on the Standby universe../bin/yb-admin \ -master_addresses <standby_master_addresses> \ -certs_dir_name <cert_dir> \ get_xcluster_safe_time include_lag_and_skewExample Output:
[ { "namespace_id": "00004000000030008000000000000000", "namespace_name": "dr_db3", "safe_time": "2023-06-08 23:12:51.651318", "safe_time_epoch": "1686265971651318", "safe_time_lag_sec": "24.87", "safe_time_skew_sec": "1.16" } ]safe_time_lag_secis the time elapsed in microseconds between the physical time and safe time. Safe time is when data has been replicated to all the tablets on the Standby cluster.safe_time_skew_secis the time elapsed in microseconds for replication between the first and the last tablet replica on the Standby cluster.Determine if the estimated data loss and the safe time to which the system will be reset are acceptable.
For more information on replication metrics, refer to Replication.
Restore the cluster to a consistent state
Use PITR to restore the cluster to a consistent state that cuts off any partially replicated transactions. Use the xCluster safe_time obtained in the previous step as the restore time.
If there are multiple databases in the same cluster, do PITR on all the databases sequentially (one after the other).
To do a PITR on a database:
-
On Standby (B), find the Snapshot Schedule name for this database:
./bin/yb-admin \
    -master_addresses <standby_master_addresses> \
    -certs_dir_name <cert_dir> \
    list_snapshot_schedules
Expect output similar to the following:
{ "schedules": [ { "id": "034bdaa2-56fa-44fb-a6da-40b1d9c22b49", "options": { "filter": "ysql.dr_db2", "interval": "1440 min", "retention": "10080 min" }, "snapshots": [ { "id": "a83eca3e-e6a2-44f6-a9f2-f218d27f223c", "snapshot_time": "2023-06-08 17:56:46.109379" } ] } ] } -
Restore Standby (B) to the minimum latest consistent time using PITR.
./bin/yb-admin \
    -master_addresses <standby_master_addresses> \
    -certs_dir_name <cert_dir> \
    restore_snapshot_schedule <schedule_id> "<safe_time>"
Expect output similar to the following:
{ "snapshot_id": "034bdaa2-56fa-44fb-a6da-40b1d9c22b49", "restoration_id": "e05e06d7-1766-412e-a364-8914691d84a3" } -
Verify that restoration completed successfully by running the following command. Repeat this step until the restore state is RESTORED.
./bin/yb-admin \
    -master_addresses <standby_master_addresses> \
    -certs_dir_name <cert_dir> \
    list_snapshot_restorations
Expect output similar to the following:
{ "restorations": [ { "id": "a3fdc1c0-3e07-4607-91a7-1527b7b8d9ea", "snapshot_id": "3ecbfc16-e2a5-43a3-bf0d-82e04e72be65", "state": "RESTORED" } ] } -
Promote Standby (B) to the active role:
./bin/yb-admin \
    -master_addresses <standby_master_addresses> \
    -certs_dir_name <cert_dir> \
    change_xcluster_role ACTIVE
Changed role successfully -
Delete the replication from the former Primary (A):
./bin/yb-admin \ -master_addresses <standby_master_addresses> \ delete_universe_replication <primary_universe_uuid>_<replication_name> -
Resume the application traffic on the new Primary (B).
To do a PITR on a database:
-
In YugabyteDB Anywhere, navigate to Standby (B) and choose Backups > Point-in-time Recovery.
-
For the database, click ... and choose Recover to a Point in Time.
-
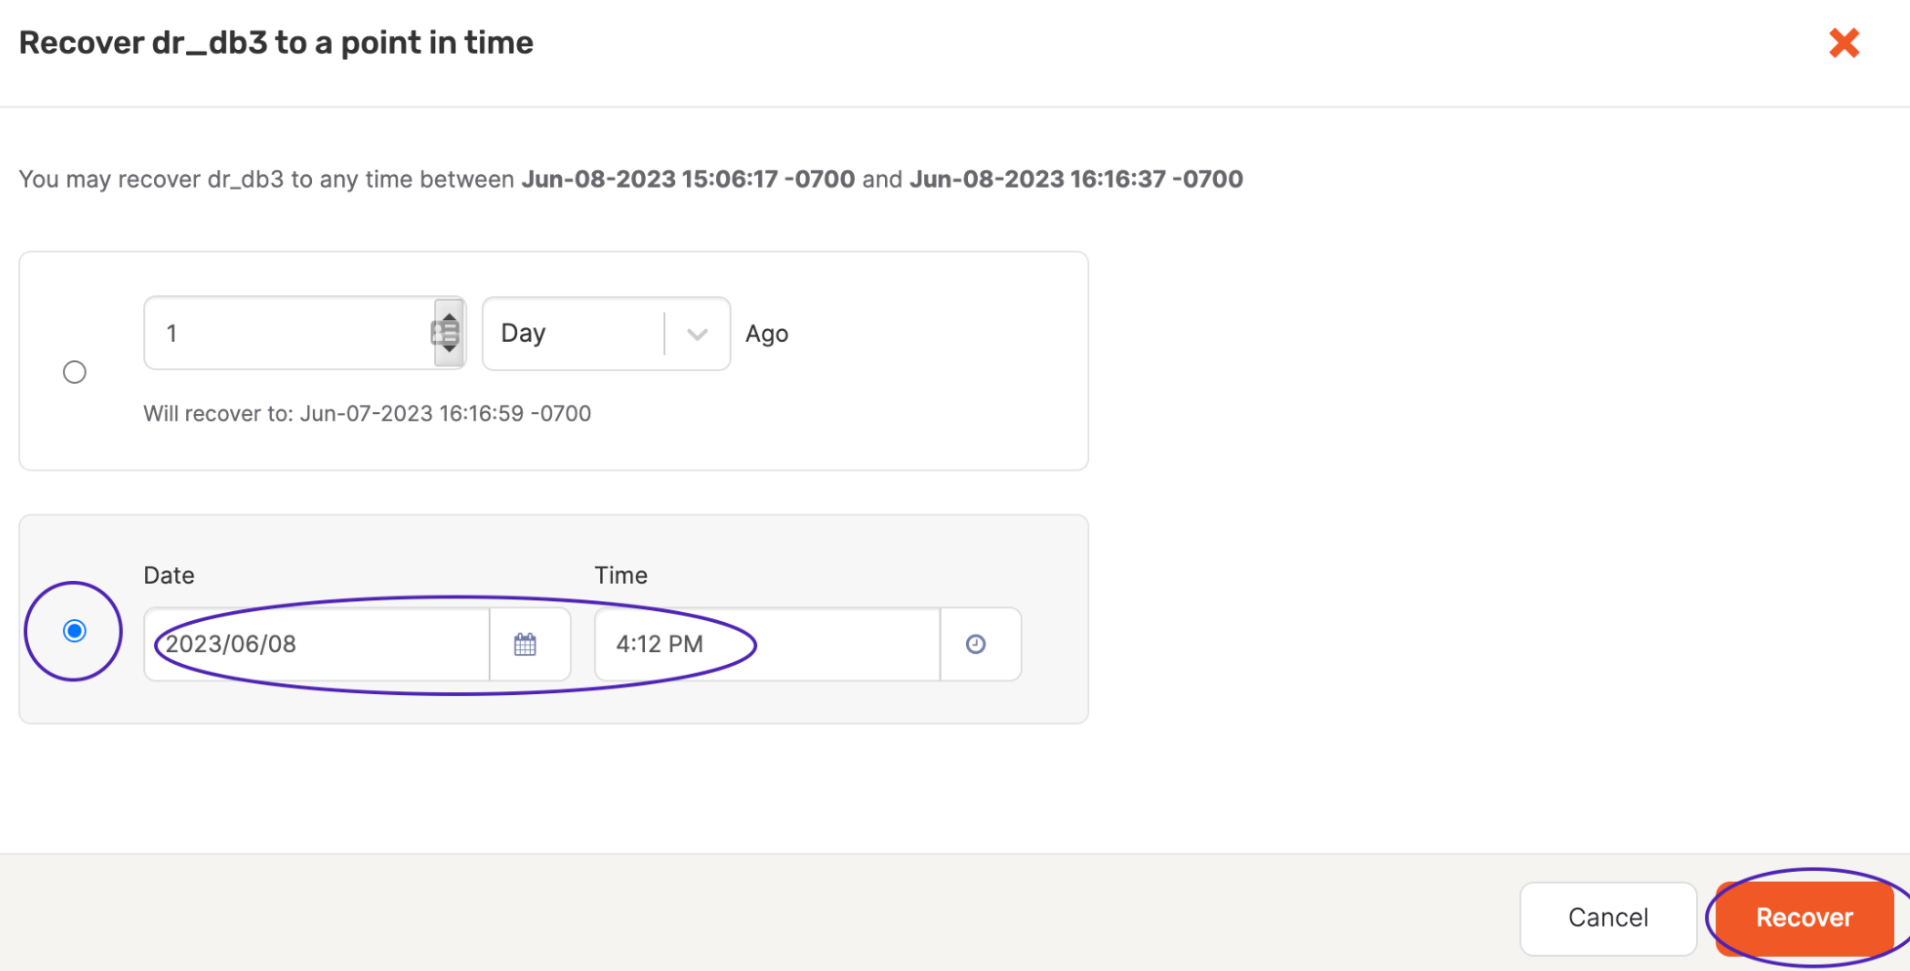
Select the Date and Time option and enter the safe time you obtained.
By default, YBA shows the time in local time, whereas yb-admin returns the time in UTC. Therefore, you need to convert the xCluster Safe time to local time when entering the date and time.
Alternatively, you can configure YBA to use UTC time (always) by changing the Preferred Timezone to UTC in the User > Profile settings.
Note that YBA only supports minute-level granularity.
-
Click Recover.

For more information on PITR in YugabyteDB Anywhere, refer to Point-in-time recovery.
-
Promote Standby (B) to ACTIVE as follows:
./bin/yb-admin \
-master_addresses <standby_master_addresses> \
-certs_dir_name <cert_dir> \
change_xcluster_role ACTIVE
Changed role successfullyThe former Standby (B) is now the new Primary.
-
In YugabyteDB Anywhere, navigate to the new Primary (B), choose Replication, and select the replication.
-
Click Actions > Delete Replication.
-
If the former Primary (A) is completely down and not reachable, select the Ignore errors and force delete option.
-
Click Delete Replication.
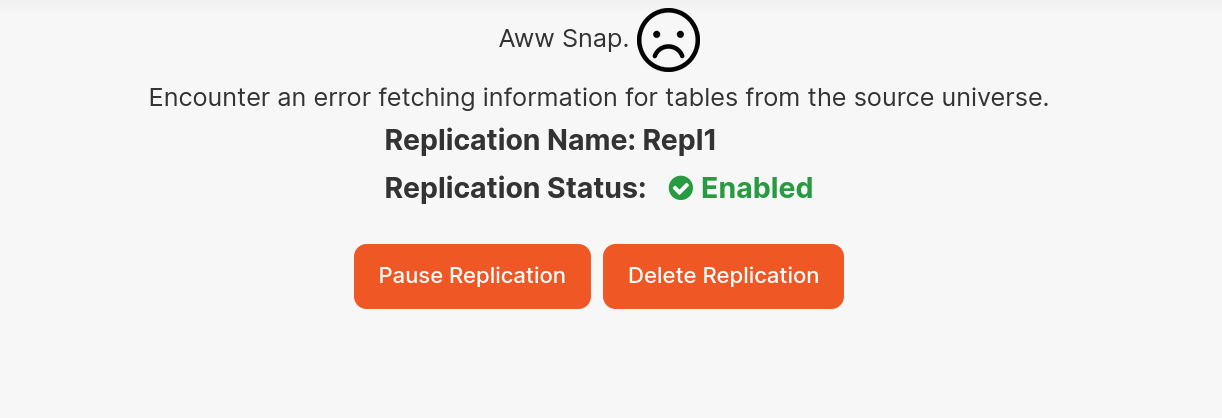
If the old Primary (A) is unreachable, it takes longer to show the replication page on the UI. In this case, an error similar to the following is displayed. You can either pause or delete the replication configuration.

For more information on managing replication in YugabyteDB Anywhere, refer to View, manage, and monitor replication.
-
Resume the application traffic on the new Primary (B).
After completing the preceding steps, the former Standby (B) is the new Primary (active) universe. There is no Standby until the former Primary (A) comes back up and is restored to the correct state.
Set up reverse replication
If the former Primary universe (A) doesn't come back and you end up creating a new cluster in place of A, follow the steps for a fresh replication setup.
If universe A is brought back, to bring A into sync with B and set up replication in the opposite direction (B->A), the database on A needs to be dropped and recreated from a backup of B (Bootstrap).
Do the following:
-
Disable PITR on A as follows:
-
List the snapshot schedules to obtain the schedule ID:
./bin/yb-admin -master_addresses <A_master_addresses> \ list_snapshot_schedules -
Delete the snapshot schedule:
./bin/yb-admin \
    -master_addresses <A_master_addresses> \
    delete_snapshot_schedule <schedule_id>
-
-
Drop the database(s) on A.
If the original cluster A went down and could not clean up any of its replication streams, then dropping the database may fail with the following error:
ERROR: Table: 00004000000030008000000000004037 is under replicationIf this happens, do the following using yb-admin to clean up replication streams on A:
-
List the CDC streams on Cluster A to obtain the list of stream IDs as follows:
./bin/yb-admin \ -master_addresses <A_master_ips> \ -certs_dir_name <dir_name> \ list_cdc_streams -
For each stream ID, delete the corresponding CDC stream:
./bin/yb-admin \
-master_addresses <A_master_ips> \
-certs_dir_name <dir_name> \
delete_cdc_stream <streamID>
-
-
Recreate the database(s) and schema on A.
-
Enable PITR on all replicating databases on both Primary and Standby universes by following the steps in Set up replication.
-
Set up xCluster Replication from the ACTIVE to STANDBY universe (B to A) by following the steps in Set up replication.
Do the following:
-
In YugabyteDB Anywhere, navigate to universe A and choose Backups > Point-in-time Recovery.
-
For the database or keyspace, click ... and choose Disable Point-in-time Recovery.
-
Drop the database(s) on A.
If the original cluster A went down and could not clean up any of its replication streams, then dropping the database may fail with the following error:
ERROR: Table: 00004000000030008000000000004037 is under replicationIf this happens, do the following using yb-admin to clean up replication streams on A:
-
List the CDC streams on Cluster A to obtain the list of stream IDs as follows:
./bin/yb-admin \ -master_addresses <A_master_ips> \ -certs_dir_name <dir_name> \ list_cdc_streams -
For each stream ID, delete the corresponding CDC stream:
./bin/yb-admin \
-master_addresses <A_master_ips> \
-certs_dir_name <dir_name> \
delete_cdc_stream <streamID>
-
-
Recreate the database(s) on A.
Don't create any tables. Replication setup (Bootstrapping) will create tables and objects on A from B.
-
Enable PITR on all replicating databases on both Primary and Standby universes by following the steps in Set up replication.
-
Set up xCluster Replication from the ACTIVE to STANDBY universe (B to A) by following the steps in Set up replication.
Replication is now complete.
To verify replication, see Verify replication.
If your eventual desired configuration is for A to be the primary universe and B the standby, follow the steps for Planned switchover.